Part 4: Assembly

Now that we've painted our frame it's time to reassemble our bike. In order to make a functioning fixed gear bicycle we'll be using mostly parts that we already have from our original bike, but we'll also have to buy a few parts. Here are all of the parts that we need in order to complete the bicycle, starting with the ones that we already have:

Main Frame Parts:


            An additional part I forgot is the bottom bracket, which really didn't absolutely need to be removed to begin with.


            You might notice that I replaced some of my original parts for newer parts. This is entirely optional and is not required for a finished fixie. The following parts on the other hand for the most part must be purchased separately in order to complete your bicycle:


            Note that you could in theory use the crankset and chainring that you already have but that would require a different chain and cog size.

            Also note that only a fixed gear rear wheel is required. It is possible to reuse your existing front wheel. You must buy a wheel with a fixed gear hub in order to safely fasten your cog and chaining. Trying to reuse your existing rear wheel can be extremely dangerous.
           When buying your cog and chainring it is important to consider what gear ratio is best for you and the area you live in. People in hilly areas will want a low gear to make climbing hills easier, while people in flat areas will prefer a higher gear.
            Once you have all of your parts its time to put everything onto your frame. If you have any, it's a good idea to grease any threads before screwing in bolts to make removing them in the future easier. Frankly the order you add everything to the bike doesn't mater, but I like to start by reattaching the bottom bracket using the bottom bracket tool, as well as the front fork using the large crescent wrench. (Assuming you haven't already).


            Now lets assemble our rear wheel. Screw in the cog by hand clockwise, then use the chain whip to tighten it. You'll want this very tight to avoid it coming loose during riding.


Next screw in the lockring clockwise using the lockring tool.

Now slide the front and back wheels into their respective place and tighten them in. Don't tighten the rear wheel all the way as we'll need to loosen it later when we add the chain.


            From here it's a simple matter of adding the crankset (making sure the chainring is on the right side of the bike), the handlebars, brakes and seat. You might also choose, as I have, to add grip tape to the handlebars. Do this after you have fastened the brake leaver. And make sure that the front wheel is perfectly lined up with the headset.


Now using needle nose pliers and a crescent wrench thread the brake cable through the caliper. Later you can adjust the brake tension per your own preference.


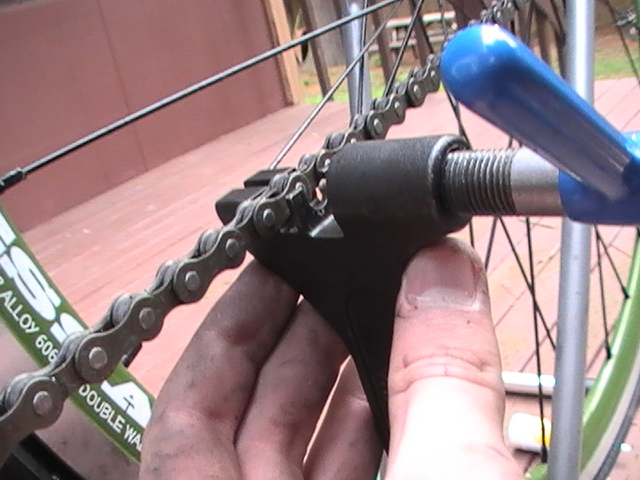
Finally the chain tool remove links of the chain until it is the proper length and then add it to your bike.


Slide the rear wheel back along the dropout until the chain is sufficiently taught and tighten the rear wheel bolts. Also make sure that the rear wheel is correctly aligned with the frame. This is why a horizontal dropout was necessary.
            And with that your fixie is complete!


Part 3: Painting

The process of painting your frame is by far the most difficult part of this project. However it's also the most rewarding and it allows you to personalize your bike to your heart's content.
            Before we can apply any paint to our frame we must first remove the paint currently on it. This is important to allow for future paint to stick to the frame. Here are the things we'll need for this:

           
            Note that really the only reason for the toothbrush in this case is because my paint remover is a paste rather than a spray. If you can find a spray can of paint remover the toothbrush is completely unnecessary. Some other things that you might find useful include sandpaper or even a power sander. Also don't forget to use gloves and goggles when handling the paint remover as it does burn your skin on contact.
            To begin removing paint from the frame start by applying a generous coat of paint remover to any areas covered in paint, avoiding areas that are not such as the bottom bracket (inside the frame). After a few minutes the paint will start to bubble and can then be easily chipped off revealing the metal below.


Try to get as much paint off as you can, you might even have to apply a second coat of paint remover. Eventually you'll be left with just a few spots of paint which you can then remove by hand with sandpaper.


Once you're satisfied with the amount of paint removed from the frame, wipe any residual dust or oil from the frame away with a wet paper towel. It's crucial that the frame is as clean as possible for when you paint it.
            Next tape up any chrome or decals with painter's tape and fill in any holes in the frame with newspaper. You do not want any paint to get inside the frame.


            Now you're ready to paint. For the best quality paint job possible with typical spray-paint we'll need to use a primer and a clear epoxy in addition to our solid color.


            For my bike I decided to go with a grey color. It's best if the color of your primer matches that of your top coat.
            You'll want to wait for a warm dry day when painting. If you try and paint in the cold or when it's very humid out your paint will run and you'll end up with a horrible paint job. If it doesn't seem like it will be warm any time soon you can also try and paint inside with the heat turned on. But make sure you have very good ventilation if you do decide to do this.
            Regardless of where you paint find somewhere to hang your frame up so that you can paint all surfaces without having to touch it.


            First apply a thin coat of primer using quick straight motions to ensure that the paint doesn't build up and drip. Once you have fully coated the frame repeat the process a second and third time. You'll want at least three coats of primer before you can apply the top coat. Once your primer dries take the frame down and lightly sand the surface. This creates a rough surface so that the next coat has no problem sticking. Next, apply two or three layers of your top coat being just as careful to prevent the paint from running. Lastly, after the paint has fully dried apply a few players of clear epoxy. This gives the paint additional strength as well as a nice shine. Here's my frame after all of the painting:

 Finally remove all of the tape and newspaper to reveal your stunning new paint job.

Part 2: Disassembly

Here are all of the tools you'll be needing for taking apart your bike:


            Using the tools above remove everything carefully and save everything. It might also be a good idea to put nuts and bolts from different parts of the bike into labeled bags. Like I mentioned earlier, this is because we'll be reusing a lot of these old parts, so be careful not to lose anything.
            Here's my frame after I've removed everything:


            Now that you've removed everything from your bike take a minute and asses the quality of your frame before moving onto the next step. As you can see the paint on this frame is a little bit worn and frankly I'm not too fond of the color. Because of this I have no problem with repainting it. However, if you're converting a newer bike into a road bike you might find that the paint on your frame is hardly worn at all. In that case, unless you absolutely despise the color I would recommend against repainting the frame. Painting a bike is a long and hard process, and unless you have it done professionally the paint you apply will not be as durable as the paint that is already on your frame. This is because professionally painted bikes are painted using a process called powder coating which practically fuses the paint with the metal of the frame. If you do decide to repaint your bike move on to part three of this guide, if not go ahead and skip to part four. 

Part 1: Choosing a Frame

The most important part of any bicycle is the frame. For a fixie, most any road bike frame will do, but there are a few things to consider.
            First of all, when choosing a frame for your fixie avoid frames with vertical dropouts. The dropout on a frame is the slot that the rear wheel slides into. Because of how the chain tension on a fixed gear bike works, only frames with horizontal or semi-horizontal dropouts are acceptable for building a fixed gear bicycle. The reason for this will be discussed in more detail later, but for now here are a few examples of dropouts that will work and dropouts that will not:


            Second, it's very important that you pick a frame size that is right for your body type. A good frame should be short enough to easily get on and off, but tall enough so that you don't have to stretch your legs to pedal. If you're still having trouble figuring out what size is right for you here is a calculator that will help. 
            Lastly you'll want to think about what material your frame is made of. In general the material wont affect your ability to convert any bike into a fixie. However, different materials differ greatly in price and they can drastically affect the feel and comfort of your ride. Of the four most common frame materials steel, aluminum, fiberglass, and titanium, for this project I would recommend a steel or aluminum frame. This is because fiberglass and titanium can be extremely expensive even when bought used. Aluminum frames are light but many people dislike them as they tend to offer a harsh ride. Steel frames on the other hand tend to be heavier but offer a much more comfortable ride. In the end it comes down to personal preference.
            But where do you find a bike to convert into a fixed gear? For this guide I'll be restoring an old road bike I found after a bit of hunting at a local thrift store. You should also try visiting garage sales or browsing craigslist in search of a project bike. You might also consider converting a road bike you already own into a fixed gear. Here is the bike I'll be using:


Once you've found your bike you're ready to start taking it apart.

Overview

            Quality fixies can be expensive. For this reason it's not uncommon for people to convert their old road bikes into fixies. Conversions like these are a lot of work, but are a much cheaper alternative to buying new, and can be very fun and rewarding.
            For this guide I'll be explaining the full process of converting a road bike into a fixie. This includes choosing the frame that's right for you, disassembling that frame, doing a full paint job, and lastly reassembling it with the necessary fixed gear parts. For a lot of the build we'll be recycling old parts from your original bicycle, but in some cases you will need to buy additional parts. In addition most of the tools we'll be using are fairly standard and you probably have already, but some tools are bicycle or even fixie specific and need to be bought separately. If all goes well, we'll be left with a practically new fixie for half the price of buying one, and we'll have learned a lot of things along the way.

What is a Fixie?

            A Fixie, otherwise known as a fixed gear bicycle, is a type of bicycle with a single gear ratio and a rear wheel cog that is locked onto the wheel without the ability to coast. This means that as long as the back wheel on a fixed gear bicycle is in motion the pedals are also in motion. This gives the rider increased mobility, but can also make riding fixed gear in hilly areas quite a chore.
            Another aspect of fixed geared bicycles that separates them from geared bikes is their simplicity and light weight. Because fixies lack the ability to change gears they require substantially fewer parts than typical geared bikes. The fact that they cannot coast also eliminates the need for handbrakes in some cases, further reducing the weight and complexity of the bike. Here is a diagram illustrating the difference between the gears of a typical road bike and that of a fixie:

         
            Today, fixed geared bicycles are an important part of pop culture around the world for their unique feel and look.